How to Perform a 12-Lead ECG: A Step-by-Step Guide

A 12-lead ECG is an essential diagnostic tool that is used to assess the heart's electrical activity. It is a straightforward procedure, but accuracy is essential for the results to be reliable and suitable for clinical assessment.
We have put together this short guide on how to perform a 12-lead ECG to assist when you are taking an ECG. However, please ensure to follow any local guidelines that you may have in place.
Preparation
- Explain the procedure: Inform the patient about the ECG procedure to ease any concerns they may have and reduce their anxiety.
- Check your equipment: Ensure the ECG machine is functioning correctly and has electrode pads and paper if required.
- Position the patient: Have the patient lie flat on their back on the examination table. Ensure they are comfortable and relaxed, with arms by their sides and legs uncrossed.
- Perform skin preparation: Clean the electrode sites with an alcohol wipe to remove oils and dirt, ensuring good electrode contact. You may need to shave the patient to remove any hair if you are unable to get a good contact.
Electrode Placement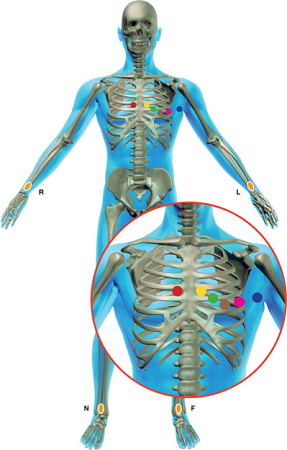
You should position the electrodes as described below. Please see our 12 ECG Lead Placement Guide for further information on where to position electrodes when taking a 12 lead ECG.
Limb Leads:
R (Right Arm): Place on the right forearm or upper arm.
L (Left Arm): Place on the left forearm or upper arm.
F (Left Leg): Place on the left lower leg or ankle.
N (Right Leg): Place on the right lower leg or ankle.
Chest Leads:
V1: Fourth intercostal space to the right of the sternum.
V2: Fourth intercostal space to the left of the sternum.
V3: Directly between leads V2 and V4.
V4: Fifth intercostal space at the midclavicular line.
V5: Level with V4 at the anterior axillary line.
V6: Level with V5 at the midaxillary line. (Directly under the midpoint of the armpit).
Performing the ECG
- Connect the electrodes: Attach the leads to the respective electrodes, ensuring that each lead is secure and correctly positioned.
- Instruct the patient: Ask the patient to remain still and breathe normally during the procedure to minimise artifacts.
- Start the ECG machine: Turn on the ECG machine and press the record button. The machine will record the heart’s electrical activity from the 12 leads.
- Check the tracing: Ensure that the ECG trace is clear and free from artifacts. You may need to adjust the electrodes or additional perform skin preparation if there are artefacts on the ECG.
- Print or file the ECG: Either print the ECG trace and label it with the patient’s details, date, and time of recording, or file a PDF copy into their medical record.
After the Procedure
- Remove the electrodes: Gently remove the electrodes from the patient’s skin.
- Provide feedback: Advise the patient that the procedure is now complete and provide any feedback if required.
- Clean up: Dispose of any electrodes and clean the reusable equipment according to local guidelines.
By following the steps in this guide, you will ensure that your 12-lead ECG is performed correctly. This will provide accurate and reliable results that are suitable for clinical assessment.
To find out how our range of i3 integrated 12 Lead ECG Machines can make your ECG testing safer, faster and easier, please visit our dedicated 12 Lead ECG Machine page or contact us on: 0114 2433896 or email: enquiries@numed.co.uk.